Wednesday, June 29, 2011

LB's Grillin' Onion

In my recent blog post, Grilling 101, LB from Bullets and Biscuits left a comment and mentioned how they have started grilling whole onions. I was immediately intrigued by that since I had always sliced the onions up prior to grilling (usually to be used on burgers or brats). I love trying new things on the grill so I had to give this a shot! Now whether LB started doing the onion thing on her own or got it from someone else matters not to me. I got the idea from her so she gets the credit.


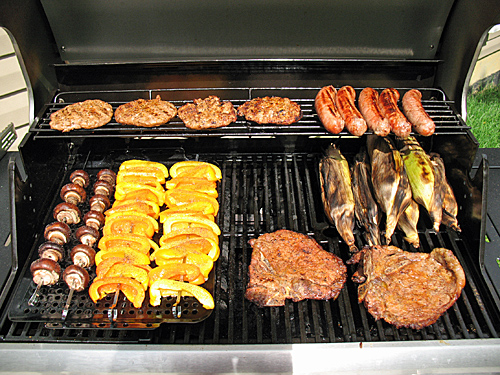
LB said they cap a Vidalia onion (yellow onions would be the next best choice) to create an indention and then add a bouillon cube and butter to the top. The whole deal is wrapped in aluminum foil and placed on the grill.


As you can see from the photo, I did not have any bouillon. I had to improvise and decided to cover my onion with A1 sauce. I added the butter and some seasoning. If you read my recent post on grilling and were a good student, you know I like to cook with low heat most of the time. I put the onion on the top rack and just let it slow cook while I was tending to the other food. I forgot to time it, but I'm guessing it was on the grill for roughly 40 minutes or so.


After everything was done and I had all the food back inside, I anxiously opened this sucker and cut into it! OH, MY WORD! Talk about something GOOD! It was fantastic! It didn't appear the A1 sauce stuck to the onion very well during cooking, but appearances were deceiving. The sauce permeated the onion and I could taste it through the whole thing! Very nice flavor!


I just had to share this since most people probably wouldn't see LB's comment where she talked about it. And I may be the only person in the world who hasn't tried grilling a whole Vidalia onion this way, but you know what? I don't care. This chizz is good stuff! I'm going to be experimenting with various sauces and seasonings just to see what kind of flavors I can get. The A1 gets thumbs up!


Thanks, LB! This is my new favorite way to grill onions! I will also be fixing onions this way at the cabin during hunting season.

Monday, June 27, 2011

Are You Preparing For The Opener?

Bow season opens in Kentucky on September 3rd. That means we have just over two months before we can start flinging arrows at the majestic whitetail. That might seem like a long time to some, but in reality, now is the time to start preparing for the opener. One of the most difficult things to do is prepare for hunting while hunting season is closed. It's summertime, kids are out of school, people are on vacation, there's yard work to be done, and it just doesn't seem like the time to think about hunting. While all of that is true, now really is the time to get ready. It's not rocket science and it's not a big secret. We as hunters know what we have to do to be ready for the opener. I'm going to touch on some of the things that I (and my hunting comrades) do to prepare and I'm sure much of it is similar to what many hunters do. I'd like to hear how you prepare for the season since I know I won't hit on everything.


Equipment
If I'm going to make any changes to my bow setup or try different arrows, etc., now is a good time to do it. Replacing a sight or switching arrows or broadheads isn't really something you want to do at the last minute. Obviously, things happen during hunting season and we sometimes have to replace things, but if it's a change you know about in advance, do it early and give yourself time to adjust. The same goes for a new scope on a rifle or a new bullet or load. Making the changes now gives you plenty of time to practice and make sure the changes are satisfactory. And that definitely applies to buying a brand new bow or gun. Make sure you have ample time to practice and be comfortable with a new bow or firearm.


I like to inspect my gear and make sure everything is in working order. If I find a problem now, I have time to repair or replace something. It's an awful feeling to be in the woods on opening day and find out something doesn't work. I look at my hunting clothes, too, and make sure there are no tears or broken zippers. 


Trail cameras that aren't already out should be checked to make sure they work. When storing a camera, be sure to remove the batteries so they don't corrode. If you plan on buying a new camera, get it early enough so you can test it before you actually need it. We've bought cameras for our property that didn't work out-of-the-box and had to be returned. 


I'm fanatical about keeping my knives sharp. Earlier this evening, I sat down at the kitchen table and sharpened three field dressing knives and a hand ax. I hadn't touched them since last season. Now they're ready to go and I won't have to deal with a dull blade when I actually need it.


I inspect my climbing stand to make sure nothing has come apart or weakened. The same goes for hang-on stands. We have some hang-on stands that actually stay up during the off season. Because those stands are exposed to the elements for a long time, it's important to check them. I'll be the first to say it sucks climbing around in the woods this time of year with all of the bugs, spiders, and poison ivy, but it's not worth risking my life because I didn't feel like inspecting a stand. We also have four permanent stands on our property. Because they are made of wood and are exposed 365 days a year, they have to be inspected for structural integrity. The coons and possums like to use our permanent stands as bathrooms. Then we get leaves and dead branches in them, too. All of that needs to be cleaned out. I really don't want to be replacing boards on a stand after the season is open. 


Now is also a good time to look for potential stand locations. We frequently move our hang-on stands from one season to the next. Because bow season opens so early in Kentucky, many of our tree stands are difficult to hunt from due to all of the foliage. The view in September is radically different from the view in November. We often have to set stands in areas that give us the best possible view in September knowing we may move them once the leaves are off.


Does your ATV or UTV need an oil change, a new battery, or tires? Have you started it since the end of last season? Do the headlights work? If you don't ride your machine on a regular basis, start it up periodically and make sure everything works. How about your utility trailer? If you haul your ATV on a trailer, check the tires and lights (if it has them). If the flooring is wood, make sure it hasn't rotted or become weak.


Practice
I suspect many hunters hang up a bow or gun at the end of the season and don't touch it again until just before the next season. I've been guilty of that many times. When it comes to bow hunting, I try to shoot throughout the off season. It's much better to shoot a little bit at a time over the course of a couple of months than it is to try to shoot a lot in a couple of days. Muscles need time to adapt and get accustomed to movements like drawing a bow. If you haven't shot since last season, that 70# draw is going to tire you out quickly.


Checking the zero on scopes is very important and now is a good time to do it. It also gives you the opportunity to get in a bit of practice. Some hunters view gun hunting as "easy" in comparison to bow hunting, but in reality, practice is just as important with a firearm as it is with a bow.


Conditioning
There's not a flat piece of ground anywhere we hunt. All of our stands require going up one or more hills to reach them. Many of the hills are very steep. They will leave you out of breath and sweating. Like everything else, you can't start exercising a week before the opener and expect to be in good shape. I try to do as much cardio as I can in the months leading up to the season. More often than not, I don't do as much as I should. And it doesn't take long to find out. Anyone who hunts in hilly or mountainous terrain knows exactly what I'm talking about. Use the off season to condition your body in preparation for the hikes and climbs.


Food Plots
Not everyone has a food plot, but if you do, is it ready? Certain plants need to be in the ground at certain times of the year. Is your existing plot in good shape? You can't throw some seeds on the ground two days before the opener and expect grand results. We had the soil tested on one of our food plots and had to add nutrients to the ground before we could even plant anything. It just wasn't optimal for growing good browse. Food plots take a lot of time and effort to achieve the desired results, especially if the plot is large. It's not something that can be neglected until a week before the opener.


Getting Permission
If you want to find new property to hunt, you should already be asking. Don't wait until the day before. Back in February, I discussed Getting Permission To Hunt Private Land in detail. I won't rehash that post, but now is the time to be asking landowners about hunting in the fall. That post explains why.


Odds and Ends
If you need some new piece of equipment or need to re-stock something, start doing that now, if you can. I do my best to have everything I need prior to opening day, but I usually forget something. Waiting until the last minute forces me to rush and never turns out well. It's not always easy to get things two months out from the season because it seems like there is plenty of time, but it goes by quickly.


What Else?
I've covered some of the things I do, or try to do, in preparation for opening day. What's something you do or what did I forget to mention? I know I didn't hit it all. Even if your opener isn't in September, it will be here before you know it.

Saturday, June 25, 2011

Fantastic Rub Recipe

I posted this recipe shortly after I first started my blog and I maybe had one reader. Since it's the grilling season and I have a couple of more readers, I thought I would share it again. This recipe was given to me by my late friend, Steven. I have used it on beef, pork, venison, and chicken and it is absolutely wonderful! It's easy to make and you can adjust the ingredients according to your taste.


  • 1/4 cup dark brown sugar
  • 3 tablespoons of minced garlic
  • 1 tablespoon of black pepper
  • 1 tablespoon of salt 
  • 2-3 tablespoons of chipolte chili powder 


In a bowl, add enough olive oil to create a paste with the above ingredients. Whisk thoroughly with a fork until mixed. 
Go slow with the olive oil. The ingredients need to mix, but you don't want the end result to be liquid.

(Vary the amount of chili powder to suit your taste. Some like it hot, others not so much. Same for the minced garlic.)

Apply liberally to beef, pork, chicken, venison, or other wild game. Allow 2-3 hours marinade time, if you like. The meat can be baked, broiled, or grilled. The rub can also be applied to the meat while it is on the grill. 

Wednesday, June 22, 2011

Grilling 101

One of the things I really enjoy is preparing food on the grill. I know I'm not alone in that - grilling is very popular. It would be a rare sight to find a house that didn't have some kind of grill out back. Over the years, I have learned a lot about using a grill, most of it through trial and error. In the beginning, there was a whole bunch of error! I was one of those guys who fired up the grill, turned the burners on high, threw the food on the bottom rack and then wondered later why stuff was burned on the outside and not cooked on the inside. Things have been different for the past decade or so after I understood how to properly use a grill.


I am not an "expert". Truthfully, I don't much like that word - too many people throw it around. What I know has come from years of hands-on doing. I've stood on the deck in the snow grilling food. That's how much I enjoy it. I've also seen how other people use a grill and some of the mistakes they've made. I've made every mistake you can think of, I promise. What I want to do is just share some tidbits and pointers I've picked up over the years. No doubt many of you (at least the 2 or 3 who actually read this blog) already have the grill mastered. But maybe I can provide a tip or bit of info that someone hasn't tried before.


For the purposes of this post, I will only be covering gas (propane) grills. Some of the information will apply to charcoal grills, but cooking over charcoal is a different animal. Many people prefer charcoal to gas. They each have their pros and cons. Rather than trying to cover too much, though, I will limit myself to gas grills.


Grill Prep
It's important to make sure your cooking grates are clean before use. Each time you use your grill, grease and food particles build up on the grates. If you don't keep them clean, not only is it harder to turn the food, but eventually the build-up will catch fire which creates flare-up's and makes it difficult to control the temperature. That's one way food gets burned.


If your grates already have a lot of build-up on them, one way to clean them is to start the grill, turn the burners on high and let the inside get hot. After a few minutes, turn the grill off and let it cool slightly, but don't wait too long. Use a stiff wire brush and clean the grates while they're still warm. And the goal here isn't to make the grates sparkle, but you want to get as much build-up off of them as possible. Ideally, the best time to clean your grill is after you've finished using it before it cools down. Then it's ready to go for the next time and you don't have to fool with cleaning it first.


Now that the grates are clean (or cleaner), take a paper towel or basting brush and wipe a coat of cooking oil on the grates, to include the top rack if your grill has one. The oil will keep food, particularly meat, from sticking to the grates and make it much easier to turn. A non-stick spray would probably work, too, but I prefer to wipe oil on mine so I don't have spray getting on the burners below. You could always take the grates out and spray them if you want to fool with that. Just don't spray into the grill while it's on, for obvious reasons.


Now that the grates are clean and oiled up, we can talk a bit about the actual cooking process.


Using The Grill 
I like to start the grill and turn all of the burners on high to let the grill get good and hot. When I'm grilling some kind of meat, I want that initial searing. Once the meat is on, I adjust the burners accordingly.


A full grill makes for happy bellies!


If you don't remember anything else from this post, please remember the following:


Low heat and time are your friends.


That is so important, I'm going to say it again:


Low heat and time are your friends.


Remember I said when I first started grilling I would turn the burners on high and put the meat on the bottom rack and then wonder why everything burned? Back then I didn't understand you don't cook with the flames, you cook with the heat. The flames will burn your food every time. It's the heat you want to control and it's the heat that cooks the food. 


I promise if you will cook on low to medium heat you will get great results. After I get that initial searing on the meat, I immediately turn the burners down. This is where low heat and time work in your favor. Using low heat keeps the meat and other food from burning and it also prevents it from drying out so much. If you enjoy chewing on a piece of leather steak, by all means crank up the burners and incinerate your food. I prefer my steak, pork, chicken, venison, or other meat to be evenly cooked and as juicy as possible. 


Steak ready to sizzle


Here's another point to remember that goes along with low heat and time:


The top rack is your friend.


The top rack of a grill is one of the best places to cook your food. In fact, I wish grills had larger top racks - most are pretty narrow. One of the easiest ways to keep food from getting too done is to move it to the top rack before it's completely finished. Remember, it's the heat that cooks. The heat is circulating around the lid of the grill and your food is going to get plenty of good heat on the top rack. There are many instances when I will start my food right on the top rack. The top rack can also be used to keep finished food warm while your other items are cooking. 


Be sure to turn your food regularly so it cooks evenly on both sides. And don't be afraid to make adjustments on the fly. If something is getting too done too quickly, turn the heat down more or move it to the top rack. Don't be so rigid in how you do things that you won't make adjustments. One little trick for cooking food slower or keeping more fragile food like vegetables from burning is to use indirect heat. Let's say you've got some meat on the left side of your grill and some veggies on the right. To keep the veggies from burning, turn the burners on that side off. Yes, I said off. The burners under the meat will provide the necessary heat to cook the veggies without them getting too done. Remember, the heat cooks, not the flames. 


Let's talk about how to plan out your grilling time so all the food is ready at the same time. In the very first picture above, you'll see burgers, brats, steak, corn on the cob, peppers, and mushrooms. Do you think I fired up the grill and put all of that food on there at the same time? Nooooo would be the correct answer. Here's the order the food was put on the grill:


1. Corn
2. Steak
3. Burgers and brats
4. Peppers and mushrooms


The corn went on first because it takes the longest to cook. Once I was satisfied the corn had a sufficient head start, I put the steak on. After the steak had time to get going, I put the burgers and brats on. Last, but not least, the peppers and mushrooms because they take very little time to finish. Obviously, this can change depending on how you like your meat - if you like it rare, you would want to put it on near the end. You need to decide which food will take longer to cook and plan your grill time accordingly.


Speaking of corn, I grill my corn right in the husk. The husk will protect the corn while still allowing it to cook thoroughly. Before I fire up the grill, I will often soak the ears of corn in a sink full of water. This allows the husks to soak up water and keeps them from drying out as quickly. I also keep a spray bottle of water on my grill and I will spray the corn periodically to keep it wet. The outer portion of the husk will burn and turn black. It's too thin not to. Don't worry about it - the corn itself will be just fine. I know some people will shuck the corn and wrap it in aluminum foil for grilling. I have done that, but I have found the corn will burn more easily in foil than it will in its own husk. Corn comes with a natural wrapping - there's no need to waste foil. After the corn is done, only shuck those ears that are going to be eaten immediately. Leave the other ears in their husks as this will keep the corn warm for quite some time. If you've never had corn fixed on a grill, you are missing out, I promise you! 


One method for grilling corn


The way I prefer to grill corn


You may be able to see in that first photo that the mushrooms and peppers are on a separate tray. I use a grilling tray for items like vegetables so they don't fall between the grates or get stuck. The holes in the tray allow the heat to flow through. I like to brush olive oil on my veggies before putting them on the grill. Everybody has their own little seasoning techniques and favorite flavors so I'm not going to get into that too much. I don't normally marinate my food prior to grilling. This is especially true for thicker marinades or sauces. What typically happens is the marinade will burn long before the meat itself is done. If I want to use a marinade or sauce, I will wait until the food has had time to cook and then I will brush the marinade on while the food is still on the grill. 


Mushrooms and peppers are great on the grill


One thing I never do is cover my grates with aluminum foil. I know people who do that, but I detest using foil to grill on. There is no reason to do that. The only time I use foil for grilling is when I'm fixing fish. But even then, I'm not covering the grates. I put the fish and other fixings inside a foil "pouch", if you will, and add water. The foil pouch keeps the moisture inside and allows the fish to cook without burning or falling apart. Aside from that, foil has no place on my grill. 


Misc Tips
I use a propane gauge that attaches directly to the line to let me know how much propane is left in the tank. This little gadget can be a lifesaver. It's no fun to be halfway through a grilling session and run out of propane. I've gone an extra step, though, and actually started this several years ago. I have two propane tanks and the one on standby is always filled. When the one on the grill is empty, I replace it with the standby and go have the empty one filled and it becomes the standby. 


Some people use a timer to help them keep food on the grill for the right length of time. I personally don't use one. I've grilled so much and made so many mistakes that I just know when things are done from experience. If you're not comfortable with that, a timer or time chart can be a valuable aid. All of that kind of info can be found on the Internet. The same goes for a meat thermometer - I don't use one. There's nothing wrong with using one, though, particularly on larger pieces of meat. 


You say you don't like your burgers getting plump while they cook? Before putting them on the grill, take your thumb and make an indention on one side of each burger. Put the indention side face down on the grates. You won't have to worry about your burgers swelling up like an Alabama tick on a hound dog. 


Hopefully, you have a good, sturdy spatula (mine is Pampered Chef - LOL) and not one made out of plastic. If you occasionally coat it with cooking spray, it will make it much easier to pick the food up and turn it. 


Grill Care
I mentioned earlier that you should keep the grates clean. It's also a good idea to clean the inside of the grill from time to time. The bottom of the grill will be a collection of food and grease. If you are a seasonal griller, you could clean it before putting it away for the winter. If you grill year round like me, a good cleaning a couple of times a year will help prolong the life of your grill. 


Speaking of prolonging the life of your grill, the worst thing you can do is leave it exposed to the elements. If your grill sits on an open deck or patio like mine does, it's important to keep it covered when you're not using it. I don't care if the box said your grill was stainless when you bought it, it will rust if you leave it exposed to moisture. This is especially true of the internal parts. I owned a grill once that was so large I couldn't find a cover for it and had to use a tarp. Use whatever you need to, but keep it covered. That alone will greatly prolong the life of your grill. 


Summary
Grilling is a highly personal thing and preferences vary widely. We don't all like the same thing (thank goodness). That being said, there is a right way and wrong way to cook with a grill. I promise if you do it the wrong way your food will turn out terrible. The opposite is true if you use a grill correctly. 


Remember, low heat and time are your friends! Memorize it, live it, grill it! 


Do you have any grilling tips of your own? I know I haven't covered everything, so share yours.


Happy grilling!

Sunday, June 12, 2011

Size Matters II


You wouldn't think this would be a problem, but apparently....

Saturday, June 11, 2011

Size Matters

In the world of tournament angling, it makes all the difference! We fished our fourth tournament bright and early this morning (6am or 0600 for you military types). There were 25+ teams participating in this go round. The fishing was slow initially, but began to pick up as the morning progressed. We caught twelve bass evenly split between us at six a piece. The majority hit a 7" worm rigged weedless or a medium running crank bait.


Why does size matter? On this particular lake, state reg's stipulate that a largemouth bass must be 20" in length or more in order to be kept (i.e., put in a live well for weigh-in). A bass not meeting the 20" minimum must be released immediately. In addition, an angler can only have in his or her possession one bass that is 20" or greater. Since tournaments have to abide by state reg's, this means a two-angler team could only weigh-in two largemouth bass (one per angler). Because of these regulations, one good bass could potentially win a tournament.


Of the twelve bass we caught today, one looked like a really good fish when it came to the surface - definitely one that needed to be checked. We quickly put it on the measuring board and it was a solid 19 incher. Talk about disappointment! Unfortunately, no amount of pulling, tugging, coaxing, or stretching could make it a 20" fish. So back it went. One extra inch, or in this case, the lack thereof, made all the difference. One inch stood between us and potential prize money. On the flip side, weighing in a fish that is just one inch too short will cost you money. The Fish and Wildlife Resources guys take that stuff seriously. Naturally, the big fish hit during the last hour of the tournament and we ran out of time.


Even though we haven't won an individual tournament yet, we are on track with our points. There are two tournaments remaining - one in July and one in August. And both are night tournaments. Well, the word "night" is used loosely. They start at 6pm (1800 for you military types) and end at midnight which means there are several hours of daylight. If we complete both tournaments, we will have the number of points necessary to fish the regional tournament later this fall.


Size certainly does matter. In these tournaments, it can make a big difference!